
Electrical estimating is a complex yet essential task in the construction industry. Getting the numbers right can make or break a project, and this holds particularly true for electrical takeoffs. Electrical takeoffs involve calculating the quantities of materials required to complete the electrical work of a construction project. Whether it’s the number of lights, switches, or receptacles, every detail must be accounted for to ensure accurate budgeting, minimize errors, and keep the project within financial constraints.

In this detailed guide, we’ll break down how to accurately perform a lighting takeoff, switch takeoff, and receptacle takeoff. We’ll delve into the step-by-step process for each category, offering valuable tips, tricks, and common pitfalls to avoid, and discuss how the right approach can streamline the estimation process. By following this comprehensive approach, you’ll be able to ensure that your estimates are as precise as possible, saving both time and money.
Understanding the Importance of Electrical Takeoffs
Before diving into the details of how to perform a lighting, switch, and receptacle takeoff, it’s important to grasp why accurate takeoffs are so crucial in electrical estimating. Electrical takeoffs form the foundation of your cost estimation. They dictate how much material is needed, which directly affects the price of the project. Overestimating or underestimating the materials can result in costly mistakes.
A well-done takeoff allows you to:
Predict labor and material costs with high accuracy.
Ensure proper budgeting, avoiding unexpected expenses.
Speed up procurement by providing suppliers with precise quantities.
Enhance project planning by clarifying material needs across different phases of the project.
By establishing a clear, thorough process for electrical takeoffs, you set the stage for smooth project execution from start to finish.
Lighting Takeoff
When estimating electrical work, lighting fixtures often take the longest time to quote. Suppliers need sufficient time to get back to you with pricing for the various lighting fixtures and their components. Therefore, starting with a lighting takeoff makes sense, as it ensures you get competitive prices while you work on the rest of the project.
Here’s a detailed step-by-step guide on how to accurately complete a lighting takeoff:
Step 1: Gathering the Necessary Documents
The first step in performing a lighting takeoff is gathering all the documents you’ll need, including:
Electrical drawings: These should include the lighting layout, schedules, and any notes related to the fixture types and quantities.
Lighting schedule: A comprehensive listing of all light fixtures, their wattages, and placement in the building.
Project specifications: Any additional documents specifying materials and product types required.
Step 2: Transferring Lighting Tags to the Takeoff Sheet
Once you have the relevant documents, the next step is to copy the lighting tags to your takeoff sheet. Lighting tags in the schedule correspond to different lighting fixtures used in the project. Using the lighting schedule as your reference point, ensure that every tag is accurately recorded on your takeoff sheet.
Organizing the tags into categories (e.g., general lighting, task lighting, emergency lighting, etc.) can help streamline the process. Pay careful attention to the wattage and type of light, as this will influence not only the material costs but the labor costs as well.
Step 3: Counting Fixtures Using a Handheld Tally Counter
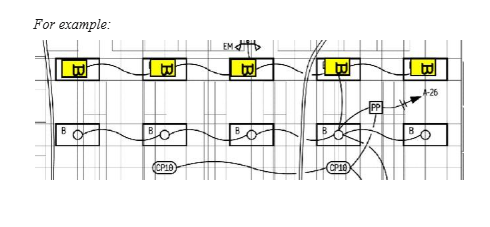
One of the most effective ways to count lighting fixtures is by using a handheld tally counter (or “clicker”) combined with highlighters. Here’s the process:
Use a specific color for each type of light fixture.
Count all the fixtures of one type and mark them with the designated color on the lighting schedule.
For large projects, it’s helpful to break down the counts by floor or phase, especially if the project has multiple levels or areas.
Step 4: Organizing the Lighting Takeoff by Floor or Phase
It’s advisable to organize the takeoff by floor or phase for better project management. For example, if the building has three floors, you could tally the number of light fixtures on each floor separately. This helps in several ways:
Labor tracking: By estimating lighting fixtures for each floor or phase, you can monitor labor hours more effectively.
Material management: When fixtures arrive at the site, having them organized by floor ensures that the right materials are available at the correct locations.
Additionally, if any discrepancies arise, it’s easier to pinpoint which area of the project is affected.
Step 5: Handling Ambiguities and Discrepancies
It’s not uncommon to encounter ambiguities in the lighting schedule or drawings. If a fixture’s tag is unclear or missing, don’t hesitate to issue a Request for Information (RFI) to the project architect or engineer. Clarifying these details early will prevent costly mistakes later on.
It’s also a good practice to cross-check your numbers with the suppliers, as they often do their own takeoffs. Any discrepancies between your numbers and theirs should be addressed immediately.
Step 6: Requesting a Comprehensive Lighting Quote
After the takeoff is completed, request a detailed quote from your suppliers. This quote should cover not only the cost of the lighting fixtures but also include the price of any necessary components such as bulbs, hangers, and mounting hardware. Some fixtures may come with additional costs that aren’t immediately apparent in the lighting schedule.
For example, if certain lighting fixtures are special-order items or require custom installation, the supplier’s quote should account for those details as well. If substitutions are made, ensure that they meet the specifications outlined in the project documents.
Step 7: Assigning Difficulty Codes to Fixtures
Another key aspect of lighting takeoff is assigning difficulty codes to each fixture based on its installation complexity. Some fixtures, such as bay lights or pole lights, require more labor and specialized tools to install than standard fixtures like troffers or recessed lights. Here’s a sample difficulty rating system:
S = Standard: Fixtures that are easily installed, such as ceiling-mounted troffers.
M = Moderate: Fixtures requiring more intricate installation, like recessed lighting.
D = Difficult: Fixtures requiring lifts or scaffolding.
E = Extreme: Fixtures that are large or custom-designed, requiring specialized installation.
This system allows for more accurate labor cost estimation and helps you predict any additional time or equipment needed for specific installations.
Step 8: Including All Necessary Components
Don’t assume that lighting fixtures will come with everything needed for installation. Many fixtures require additional components like wiring, mounts, or connectors. Always ensure that the supplier includes these in their quote. This will prevent the need for last-minute orders or delays when the installation team realizes that certain parts are missing.
Switch Takeoff
Switches are another integral part of electrical systems, and accurately estimating their quantity and type is essential for both material and labor cost estimation. Switches come in various configurations—such as single-pole, three-way, and dimmer switches—and each type has its own set of installation requirements. Here’s how you can perform a switch takeoff effectively:
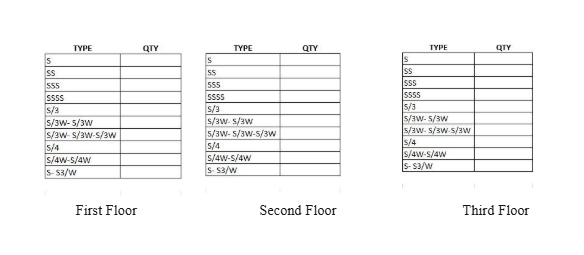
Step 1: Create a Dedicated Takeoff Sheet for Switches
Similar to the lighting takeoff, you’ll need to create a takeoff sheet for switches. List all the different switch types required for the project, including their locations and quantities. You can divide the switches by type (e.g., single-pole, three-way, four-way, dimmer) or by floor/phase for better organization.
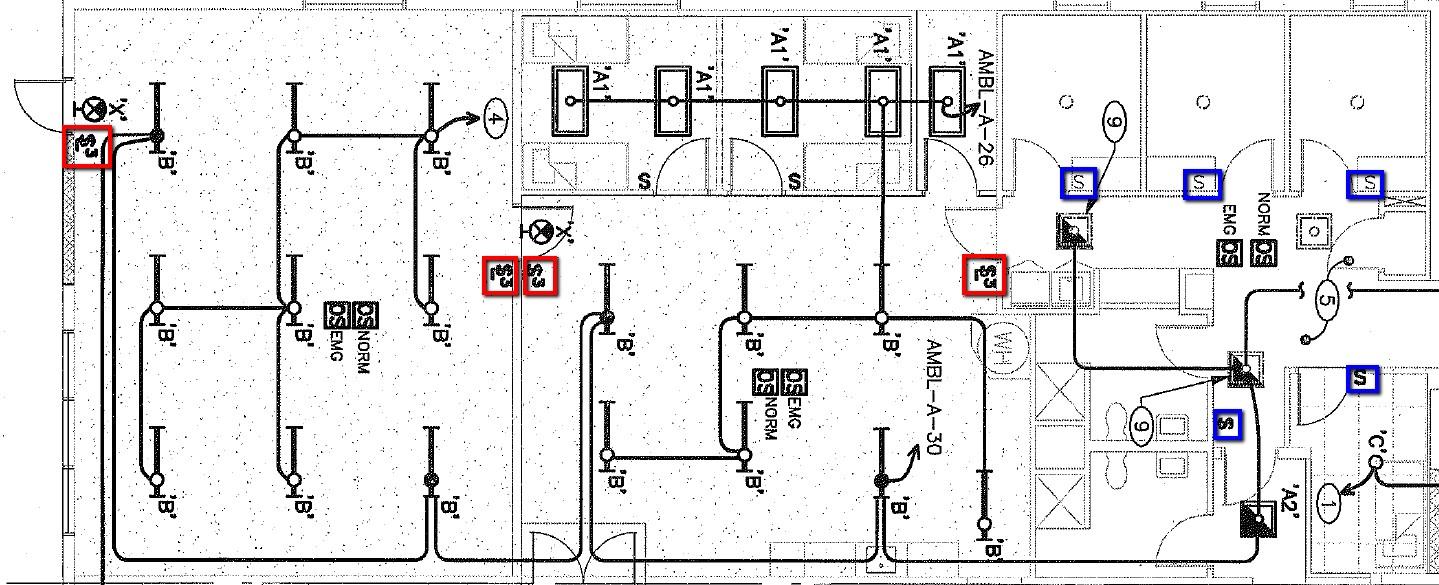
Step 2: Count Switches and Record Their Configurations
Count each switch by type and configuration. Ensure that you note whether it’s a standard single-pole switch, a three-way switch, or a specialized dimmer switch. Make sure that the type of switch matches what is shown in the electrical drawings.
Step 3: Create Assemblies for Each Switch Type
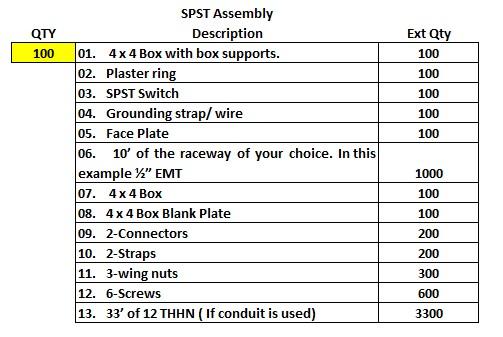
An assembly includes all the components required to install a particular type of switch. For instance, a single-pole switch assembly may include:
4×4 electrical box
Switch (e.g., single-pole)
Mounting hardware (box supports, screws)
Faceplate
Grounding strap or wire
For a more complex setup, like a three-way switch, your assembly will also include additional conductors and possibly more specialized mounting hardware.
By creating a comprehensive assembly for each switch type, you ensure that all necessary materials are included in the estimate and that no additional costs are overlooked.
Receptacle Takeoff
Receptacles, or outlets, are essential for providing power to electrical devices, and accurately estimating their quantity and type is vital for the overall electrical takeoff. Receptacles come in a range of configurations, from standard duplex outlets to specialized GFCI outlets for wet areas. Here’s how to perform a detailed receptacle takeoff:
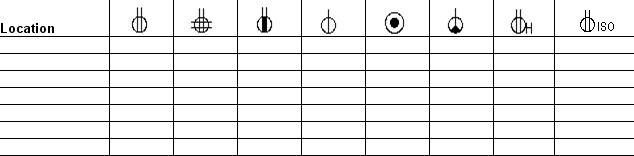
Step 1: Create a Takeoff Sheet for Receptacles
As with switches, creating a dedicated takeoff sheet for receptacles is the first step. This sheet will list all the outlet configurations required, including the number and location of each type of outlet. Accurately noting the quantity of each outlet type is essential, as different types will have different installation and material requirements.
For example, GFCI outlets required in kitchens, bathrooms, or outdoor spaces need additional components like ground fault protection and weatherproof enclosures. It is also essential to keep a clear record of the circuit details, including whether outlets are part of a general-use circuit or dedicated circuits (e.g., for appliances). This organization will help avoid confusion during procurement and installation, ensuring everything required is accounted for.
Step 2: Create Assemblies for Each Receptacle Type
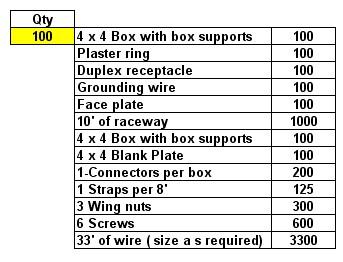
For each type of receptacle, you must create a detailed assembly list, which will outline all the necessary components for installation. A standard duplex receptacle assembly includes the following:
4×4 outlet box
Duplex outlet
Standard faceplate
Mounting screws
Grounding conductor
More specialized outlets, like GFCI outlets, often used in wet areas or outdoor spaces, require additional materials, such as:
GFCI outlet with built-in ground fault protection
Dedicated grounding conductor (if necessary)
Weatherproof or tamper-resistant faceplate
Mounting hardware
For high-demand or high-wattage outlets, such as those used for kitchen appliances, workshops, or office equipment, further considerations must be made for wire gauge, breaker sizes, and outlet durability. Properly assembling each type of outlet ensures that all components are in place before installation, streamlining the process and preventing unexpected delays.
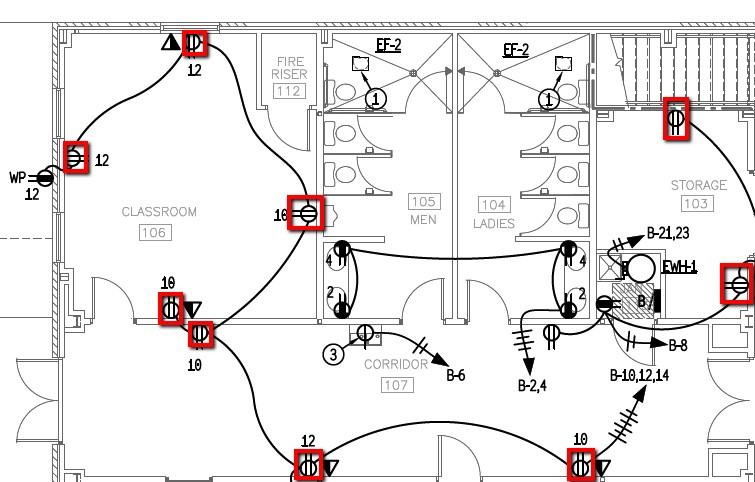
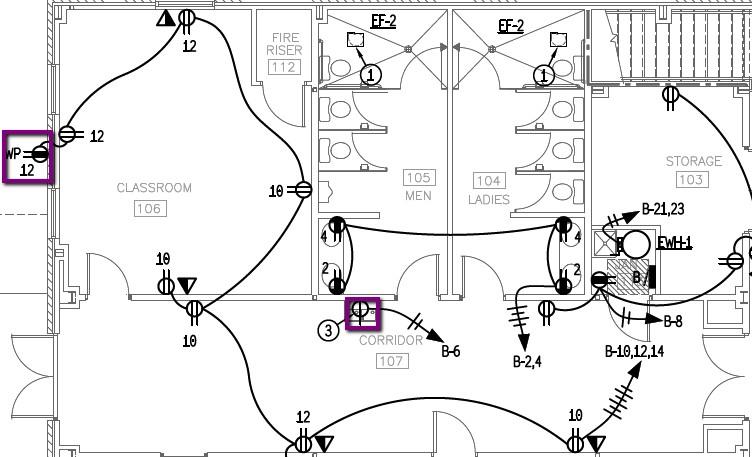
Step 3: Account for Receptacle Placement and Wiring
The correct placement of receptacles is paramount in any electrical takeoff. Proper placement ensures both compliance with electrical codes and convenience for the building’s inhabitants. Typically, outlets are installed 12-18 inches above the floor in residential settings, though variations may occur based on local codes or project-specific requirements. Special areas, such as kitchens, bathrooms, and garages, may require outlets at different heights to accommodate appliances, power tools, or safety needs.
For each outlet, you must also account for the correct wiring type and gauge. For instance, outlets in high-power-use areas (such as kitchens or workshops) often require 14-gauge or 12-gauge wire for sufficient load handling. The wiring should align with the outlet’s voltage and amperage requirements (e.g., 120V or 240V, 15A or 20A).
For areas exposed to moisture, such as bathrooms or outdoor spaces, you may need additional protective materials such as weatherproof boxes or conduit. Outdoor outlets, in particular, need careful consideration of weather-resistant faceplates and proper grounding, as these factors significantly impact the outlet’s safety and longevity.
Conclusion
Accurate electrical takeoffs for lighting, switches, and receptacles are essential for creating reliable, cost-effective electrical estimates. By following a structured and organized approach—starting with thorough document review, counting fixtures and switches with precision, creating assemblies for each component, and organizing your takeoff sheets by type and location—you’ll ensure that your estimates are not only accurate but also repeatable and scalable across different projects.
The ability to produce precise takeoffs will not only benefit your estimating process but also enhance your ability to manage labor, procurement, and scheduling efficiently. By applying these best practices, you’ll be equipped to tackle any electrical estimating task with confidence and accuracy, ultimately setting you up for success in the highly competitive world of electrical contracting.
For further reading and resources on electrical estimating techniques, you can refer to BestBidEstimating.
Continued in Understanding Stub Ups: Key to Effective Electrical Estimation


