How to Estimate Electrical Projects: A Step-by-Step Guide to Winning Bids and Making Profits

The electrical estimate is essential for anyone looking to thrive in the electrical contracting industry. The process can be complex whether you’re estimating for a residential, commercial, or industrial project. However, mastering it can set your company apart and ensure you remain competitive while achieving profitability.
In this detailed guide, we’ll walk you through every step of the estimating electrical work process, from reviewing plans to submitting your final bid. We’ll cover the critical factors to consider when estimating a project’s cost and provide tips on how to approach each phase for maximum accuracy.
The Basics of Electrical Estimating
A successful electrical estimate begins long before you start crunching numbers. The planning stage is crucial, and it sets the tone for everything that comes afterward. Here’s where you need to make critical decisions about which projects to bid on and how to approach them.
When you’re first starting out, it might be tempting to bid on every project that comes your way, but this is often a mistake. It’s essential to assess each opportunity and determine if it’s the right fit for your company’s expertise and capacity. Bidding on projects that are too far from your location, or require more manpower than you have, can quickly lead to failure. Instead, focus on projects that align with your strengths and experience.
Once you’ve decided to pursue a project, the next step is to request detailed project plans from the contractor or client. These plans should include electrical drawings, specifications, and any other relevant documentation. If possible, you should also request the architectural and mechanical plans, as these often contain information that could impact your electrical estimate. For example, major mechanical systems that require electrical connections may not be shown on the electrical plans but will be essential to your pricing.
Types of Electrical Estimators
Before we dive into the specifics of the estimating process, it’s important to understand the roles involved for electrical estimate. There are different types of electrical estimators, and each plays a distinct role in the process:
-
Senior Electrical Estimators: These professionals oversee other estimators. They have extensive experience in estimating and project management. Their job involves training junior estimators and ensuring that all bids are accurate and timely.
-
Residential Electrical Estimators: These estimators focus on residential projects, determining the costs of electrical systems and home upgrades.
-
Commercial Electrical Estimators: These professionals electrical estimate large-scale commercial projects such as office buildings, schools, and retail centers. They often rely on specialized estimating software to handle the complexity of commercial bids.
Each type of estimator must develop expertise in specific areas to provide accurate and competitive bids, and this expertise is the foundation of your success as an estimator.
The Step-by-Step Electrical Estimating Process
Accurate electrical estimate requires a systematic approach to ensure every detail is noticed. Let’s examine each phase of the estimate electrical work and how to estimate an electrical job in more detail.
1. Reviewing the Entire Set of Plans
A thorough review of the construction plans is the foundation of a successful estimate. This phase involves examining all the drawings, specifications, and conditions to ensure a complete understanding of the project.
Start with the architectural plans to understand the overall layout and function of the building. This context will help you visualize where electrical systems will be installed and identify potential challenges. Move on to the electrical plans and Division 16 of the specifications, which provide detailed information about the electrical systems, including wiring diagrams, circuit layouts, and equipment placement.
Additionally, request mechanical and structural drawings, which often include equipment requiring electrical connections. For example, HVAC systems or elevators may not be explicitly detailed in the electrical plans but can significantly impact your material and labor costs.
Pro Tip: Pay close attention to the General Conditions and Instructions to Bidders, as these often contain clauses that could affect your electrical estimate. For instance, requirements for union labor, night work, or work in occupied spaces can increase costs. Neglecting these details might result in underestimating the project cost or losing the bid due to non-compliance.
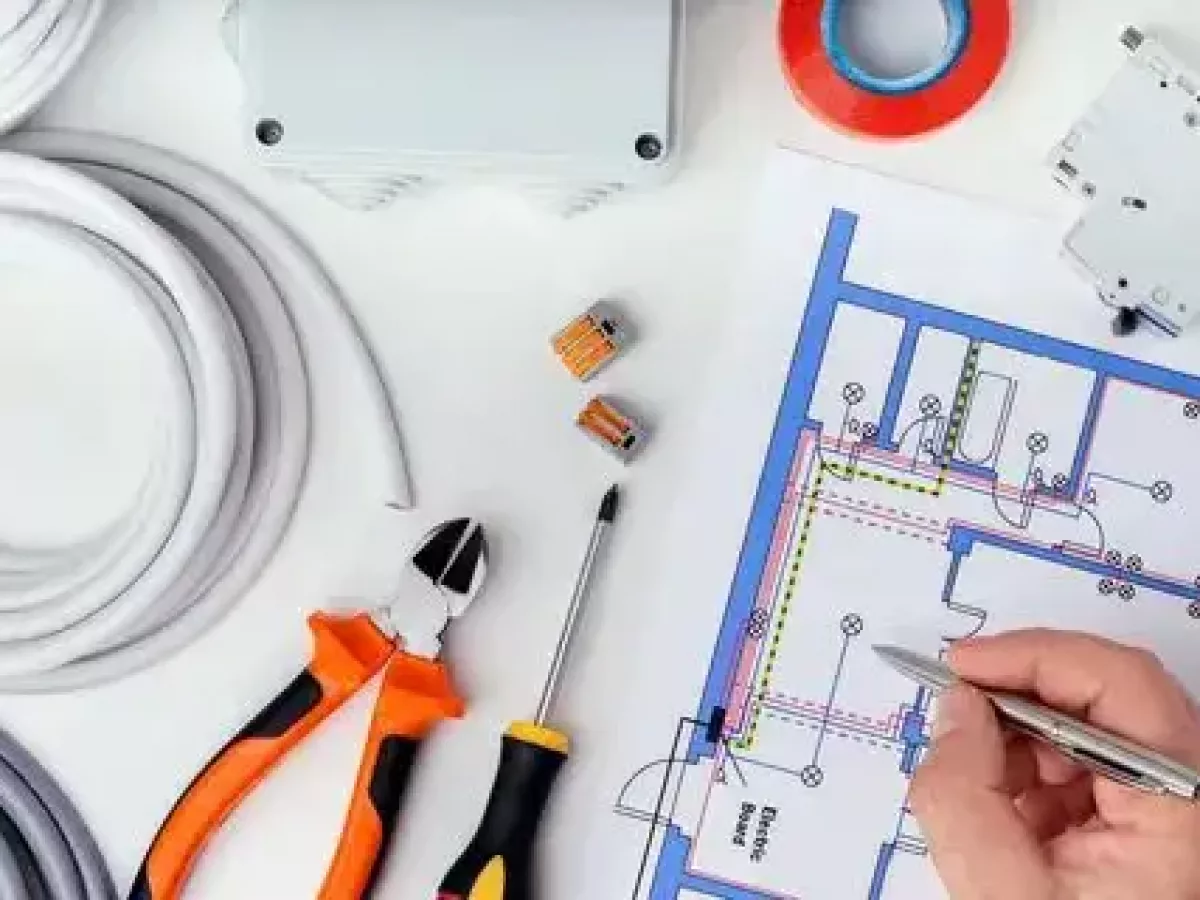
2. Performing the Material Takeoff
The material takeoff is a critical step where every component required for the project is quantified. This includes conduits, wires, fittings, switches, receptacles, and panels. The goal is to create an accurate list of materials needed to complete the job.
Modern estimators often rely on digital takeoff software like Digi Count Takeoff Pro, which automates much of this process and reduces the risk of human error. However, attention to detail is essential whether you’re using software or manual methods.
Key Tip: Don’t limit your takeoff to the electrical drawings alone. Always cross-reference other sections of the plans, such as mechanical or structural drawings, for additional requirements. For example, wiring for mechanical equipment may not appear in the electrical plans but must be accounted for in your electrical estimate.
Additional Consideration: When performing the takeoff, include allowances for waste and overage. It’s better to account for extra material upfront than to face delays or increased costs during the project.
3. Requesting Material Pricing

After completing your material takeoff, the next step is obtaining suppliers’ pricing. This phase is crucial for accurately estimating the cost of materials while ensuring you select vendors offering reliability and value.
Key Steps for Accurate Pricing:
-
Provide Detailed Specifications: Include all relevant details, such as conduit type (e.g., EMT, PVC), wire gauge, and fitting materials (e.g., steel, compression, or set screw). Ambiguity can lead to misquoted prices.
-
Request Itemized Quotes: Ask suppliers for a breakdown of prices for individual materials rather than a lump sum. This allows you to compare quotes easily and identify discrepancies.
-
Plan for Alternatives: If a specified material is unavailable or delayed, inquire about acceptable substitutes and their cost differences.
-
Factor in Logistics: Request delivery fees, lead times, and availability information. Choosing a vendor with faster delivery might be more cost-effective than opting for the lowest price.
Pro Tip: Always get quotes from multiple suppliers and check if their pricing aligns with current market rates. This helps you avoid overpaying or basing your estimate on outdated information.
4. Calculating Material Costs
Once you’ve gathered quotes from your suppliers, calculate the total material cost. This involves summing up the prices of all items listed in your takeoff, taxes, delivery charges, and other fees.
Steps to Ensure Accuracy
-
Compare Vendor Quotes: Select the supplier with the best cost, quality, and reliability balance. While the lowest price may seem attractive, delays or substandard materials can increase project costs.
-
Account for Taxes and Fees: Include sales tax, shipping, and handling fees in your final cost. These can significantly impact the total.
-
Cross-Check Against Specifications: Ensure the materials meet the project’s requirements. Using incorrect materials may lead to rework or penalties later.
-
Plan for Contingencies: Include a small buffer for unexpected costs, such as waste, breakage, or material price fluctuations during the project.
Example: If the project specifies rigid steel conduits but a vendor offers PVC at a lower cost, confirm with the client or project owner whether substitutions are permissible before finalizing your calculations.
5. Adding Labor Costs
Labor costs are one of the most significant components of any electrical work cost. Calculating these accurately requires understanding how long it will take to install each type of material and assigning the appropriate labor rate.
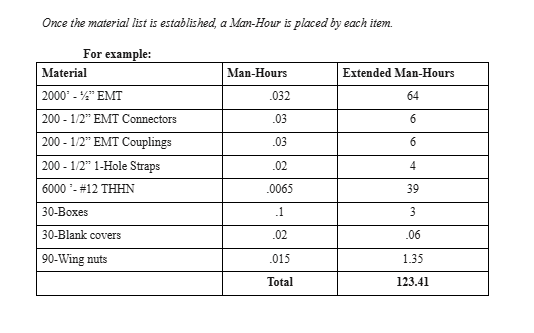
How to Calculate Man-Hours?
-
Assign time values: Determine how many hours it takes to install each material unit. For example:
-
Installing 1 foot of ½” EMT conduit: 0.032 person-hours
-
Installing one outlet box: 0.1 person-hours
-
-
Multiply by quantities: To get the total man-hours, multiply the time per unit by the total quantity of each item.
Example
-
2000 feet of ½” EMT conduit x 0.032 man-hours = 64 total man-hours
-
200 outlet boxes x 0.1 man-hours = 20 total man-hours
Adjusting for Real-world Factors
-
Crew efficiency: Larger crews don’t always work at twice the speed of smaller crews. Account for diminishing returns as crew size increases.
-
Site conditions: Tight spaces, extreme weather, or working in occupied buildings can slow progress and increase labor costs.
Finally, multiply the total person-hours by your team’s labor rate. Be sure to include costs for supervision, overtime, and any required certifications or training.
6. Including Other Costs

Beyond materials and labor, several additional costs must be accounted for to ensure an accurate electrical estimate. These include:
-
Permits: Some projects require permits for electrical work, and the costs can vary widely based on location and scope.
-
Temporary power and lighting: These costs should be included if the site lacks adequate lighting or power.
-
Equipment rentals: For larger projects, you may need to rent lifts, scaffolding, or cranes.
-
Storage and job trailers: These costs must be factored in if the project requires on-site storage or office space.
-
Clean-up and waste disposal: Don’t forget to include costs for site clean-up, especially for larger or multi-phase projects.
Real-Life Example: A project that required running conduits under an existing lake incurred significant additional costs due to the need for specialized equipment and safety measures. Visiting the site beforehand revealed this critical detail, which wasn’t apparent in the plans.
7. Calculating Overhead and Profit
Once you’ve tallied up the material, labor, and other direct costs, it’s time to calculate overhead and profit. Overhead includes the indirect costs of running your business, such as:
-
Office expenses (rent, utilities, insurance)
-
Administrative salaries
-
Marketing and advertising
-
Tools and equipment maintenance
Pro Tip: Overhead is typically calculated as a percentage of direct costs. For example, if your direct costs are $50,000 and your overhead rate is 20%, you would add $10,000 for overhead.
Next, determine your profit margin. Profit margins usually range from 10% to 20%, depending on the project’s complexity and market competition. For high-risk projects, consider increasing your margin to account for potential setbacks.
8. Final Review and Proposal Preparation
The final step in the estimating process is to review your work and prepare the proposal. This is your chance to ensure that every detail has been noticed and that your electrical estimate aligns with the project requirements.
Checklist for the Final Review
-
Double-check material quantities and labor calculations.
-
Ensure that all costs, including permits, rentals, and clean-up, are included.
-
Verify that your pricing meets the project specifications and any special conditions.
-
Review your scope of work, exclusions, and terms of payment.
Proposal Tips
-
Clearly outline the scope of work, including what is and isn’t included in your price.
-
Highlight any exclusions, such as concrete work or painting, to avoid misunderstandings.
-
Specify the validity period of your pricing (e.g., 45 days from the proposal date).
9. Submitting the Bid
The final step in the estimating process is submitting your bid. Accuracy and adherence to the Instructions to Bidders are critical to avoid disqualification. Carefully review submission requirements, such as deadlines, formatting, and additional documents, and ensure your bid complies fully.
Key Tips for Submission:
-
Follow Bid Instructions: Double-check envelope labeling, bid package numbers, and formatting requirements.
-
Prepare a Clear Proposal: Include the scope of work, exclusions (e.g., concrete or utility fees), and terms (e.g., payment schedules, work hours). Specify that pricing is valid for a set period, like 45 days.
-
Qualify Your Bid: Highlight assumptions and clarify conditions, such as changes to scope or material cost adjustments.
Before submitting, review all quantities, costs, and documents for accuracy. Visit the project site to confirm details not apparent in the plans. A well-prepared and compliant bid reflects professionalism and builds trust with the client.
TIP: If the project specifications are unclear or ambiguous, clarify them with the client before submitting your bid. It’s better to ask questions upfront than encounter issues after submitting the bid.
Conclusion
Estimating electrical projects is a skill that combines technical knowledge, experience, and attention to detail. Following a thorough process ensures that your estimates are accurate and competitive. Remember that the key to successful electrical estimate lies in careful planning, a detailed takeoff, accurate labor cost calculations, and adding in all necessary indirect costs. With practice, you’ll learn how to fine-tune your estimating process and develop a reliable system for consistently winning bids while maintaining healthy profit margins.
Ready to streamline your estimating process? Visit BestBidEstimating.com and discover industry-leading software designed to simplify your work, improve accuracy, and save time. Explore how Best Bid can help you electrical estimate smarter and win more bids today!
Continued in Mastering Electrical Takeoffs: A Comprehensive Guide for Estimating Lighting, Switches, and Receptacles